Welcome to Wardens of the Midwest! Joe from Cincinnati here.
Man, it’s been a while since I wrote an article, huh? I mean, I wrote one in September about how excited I was about the expanding meta, but I was recently educated on how misguided that article was during an episode of Second Sons. Instead of writing that article, I really should have been watching the top 8 games at Gencon and taking notes. After all, winning is the only thing that matters in this game, am I right?
But that’s not what this article is about. I’m here to talk about a deck type that has suddenly cropped up as one of the top decks in the international Meta, Night’s Watch Fealty (Wall version). Just 3 chapter packs into this second cycle, the deck has gone from low tier 2 or tier 3 to a legitimate tier 1 deck that has won several tournaments already and I wanted to talk about why that is. I’m also going to discuss the strategy behind the deck, including combos, how to play it and weaknesses that can help you learn to play it effectively. Not that it’s necessarily a difficult deck to play (but then again, what deck in this game is, truly, difficult to play?) but it’s always nice to get an inside view into the reasoning behind the decision points of a deck.
This topic will be split into two articles due to the amount of content that is covered (and the fact that I wrote 8,500 words about it…). For that reason, I’ll be discussing what made the deck so much better since the end of the first cycle, as well as the strategy behind the deck and the fancy combos available to you in part 1 and, in part 2, I will be tackling how to play the deck, the weaknesses of the deck and how to counteract those weaknesses. So, suffice it to say, we have a lot to cover. So here we go!
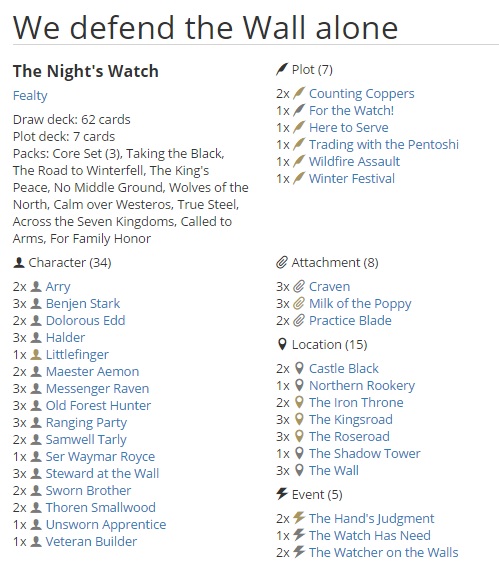
Let me first start by saying that I have been playing this deck for a long time. I have multiple revisions of the deck on Thronesdb.com and have been incrementally changing it as chapter packs have been released since around April of 2016. My most recent revision, which I posted a few weeks ago, has seen the most radical changes since I started building the deck. And the primary change, the one involving the plot deck, is NOT my original idea. Many of you may recognize the plot deck is virtually identical to the one used by Tamás Albeck to win Varberg Morghulis. Yes, I’m copying the work of a player vastly superior to myself. Since posting that deck list and testing it, I’ve made even more changes since that posting (which you can see in the screenshot above), including the removal of Old Bear Mormont, as he was too expensive for a deck running 3 low gold plots.
Wait…How Many Low Gold Plots!?!
Prior to playing this deck, the idea of running two copies of Counting Coppers is something that never even crossed my mind. That is not a lot of gold for a faction that wants to keep their board presence filled with icons. Especially since Here to Serve is also a very good plot for the Night’s Watch and that is only 3 gold. I was still a little skeptical going into testing, but I was surprised how much better the deck runs when you’re holding 6 to 10 cards each turn. And, the synergies that plot has with multiple cards in this deck are quite extraordinary.
So what is so great about having more cards in hand? Especially when the plot that allows it only has 2 freaking gold? Well, first things first; when you draw more cards, you see more economy cards. This makes the 2 gold less of a hit. Not only that, but there are a lot of very good cheap cards that really help the Night’s Watch, so this plot allows you to draw 5 cards and see, say, a Samwell for 2 gold, or a Milk of the Poppy for 1 gold, or The Watch Has Need for 1 gold, or an Old Forest Hunter for 2 gold (who then can create more gold if you need it). But, beyond that, The Night’s Watch has received some insanely efficient cards in the first two chapter packs of this 2nd cycle. Let’s take a look at 3 of the 4 cards they received to get an idea of why they are so good, even with very little gold (I’m leaving the White Tree out only because it doesn’t really fit into this “efficient cards for a Wall deck” subsection, not because it isn’t amazing. Because it is.)
Brand New Cards That Rock!
- When you’re looking at defending all 3 challenges, nothing is better than cheap characters with good abilities. And that is exactly what you have in Dolorous Edd. Edd, technically, only costs a faction card kneel to play, since you’ll very rarely ever actually marshal him, and he has 3 strength and an intrigue icon. So, when you’re looking for an intrigue icon to help oppose all 3 challenges, drawing 5 cards (with Counting Coppers) gives you a relatively good chance of drawing him. And playing him costs no gold for you. So having 2 gold on that turn doesn’t stop Edd from coming into play. And, if you win, you can return him to hand if you want to.
- In a similar vein, Arry is a 4 for 3 bicon (Military and Intrigue) who can be returned to hand to draw a card, but also has ambush so that you can use her as a surprise character during the challenges phase. Both of these characters are resistant to stealth, as they can easily come into the game from your hand rather than start on the table and be stealthed, and both provide a surprise factor that can really throw off your opponent’s challenges phase. They are both resistant to wildfire, due to the ability to return to hand, and are very difficult to kill. Not only that, but they both also assist in winning challenges that your opponent may not see coming. This ties into the newest character that they got just this past week, Thoren Smallwood. Both of these characters can show up in the challenges phase after attackers have been declared. This means, unless your opponent is aware of them and overcommits to account for their strength, you have a better chance of winning challenges on defense with these two characters. In combination with the Shadow Tower and Thoren, you could be gaining additional power or forcing some of their best characters from declaring challenges with the flexibility these two characters give you.
- Craven is unbelievable. Listen, I can’t say enough about this card. It’s so good, it may be better than Milk of the Poppy; the card that pretty much every deck runs now. At least in a defensive deck. Milk may blank their text, but they can still attack and lend their strength to winning challenges (and hence making you lose power, cards or characters). With Craven, they can’t even do that. So, unless they have an ability that works outside of them personally attacking such as Tywin’s gold, Tyrion’s gold or Nymeria’s icon removal, they are functionally worthless, unless you attack them back. In the entire game, there is only one character that is played primarily as a defender, Old Bear Mormont (you can count Left and Right if you would like. I don’t.) With that in mind, Craven is probably the most impactful card the Night’s Watch has, and definitely the best card released in the entire second cycle. Possibly even the best negative attachment in the game. There are so many superlatives you can attach to this card. It has won me so many games already. Negating their best attacker is amazing. Negating their 3 best attackers is game over. What are the odds of seeing 2 to 3 in one game? Well, there’s so much draw in this deck that you’ll see them. Trust me on that. This works well with Milk of the Poppy as well, as your opponent often has to choose. Do they un-craven their best attacker? Or do they un-milk their Nymeria? It’s a win-win. And if they blow their Confiscation on something else early on, e.g. Longclaw or Practice Blade? Good luck dealing with the rest of the attachments after that.
As the game is right now, the only two factions that have additional attachment hate are Baratheon, with Maester Cressen , and Targaryen, with Core Viserys and Waking the Dragon (and Vaes Dothrak, which may see play soon if these negative attachments keep getting released). The only other playable attachment hate is Confiscation and the Rattleshirt’s Raiders…and we have an answer for them ;). I mean, Maester’s Chain is out there, but that is something that almost no faction can fit into their deck. For now anyway…
Oh, and did I mention that Halder can kneel your Cravens to give your characters +1 strength? Because he can. Abuse it, it’s ridiculous!
When you see more cards, you get more options. And choosing the best card for the best situation is always going to put you in a great situation. Before I ran this plot deck, I often found myself top decking late in the game, desperately looking for that icon I’m missing or the Milk or Craven I need to stop their biggest threat. With Counting Coppers, you’re more than doubling the number of cards you draw that turn. And, with so much card draw, you’re going to see more economy and you’re going to have more cards to create gold with the Old Forest Hunter. He is another cornerstone of this deck that makes running low gold plots less painful. As you may know, Old Forest Hunter can only use his ability once per phase, but there is an action phase in both the plot phase (after when revealed effects) and the draw phase (After you draw). You can even use him in the Taxation phase, after you discard down to reserve and return all your gold, in order to bank some gold for the next turn. When you consider that Night’s Watch also has one of the best draw suites in the game in the form of their Messenger Ravens, as well as The Watch Has Need, Samwell Tarly, Arry and, if you run him, Will …you’re going to be seeing a lot of cards as the game goes on.
With this plot deck, the deck does require a bit more skill, since you’ll be managing a lot more cards with a little less gold but it is still a Wall deck and the primary goal of getting the Wall out and defending it hasn’t changed. The dynamics of the deck have changed, but that’s only because of the aforementioned management of the cards in your hand and the decisions on what to play, what to discard to gain gold (with Old Forest Hunter) and what takes priority over what.
Before I get into even more detail, I wanted to note that several of the changes I made to the deck were based on nearly endless discussions and theory crafting with Daye Kaniel (That’s his name on Facebook anyway). He is one of the hosts of the podcast Decklist and Chill, where he and a few of his mates from Ye Olde Englande discuss various deck types and go into detail about what they include and how they came to those decisions. And they are funny as hell while doing it too. If you haven’t listened to them yet, please take some time to give them a shot. Easily one of the most enjoyable podcasts in the community right now. Those Brits can be pretty funny when they want to be. They are three episodes in and you can find those episodes here.
He has tested the deck as much as me, if not more, and a lot of the card decisions have been based off his experiences in game as well as mine. I am no longer the island that I once was. There are finally people to talk to about the Night’s Watch! 😀
Now, back to the meat of the article…
What Kind of Combos Can I Play in This Deck?
I’m glad you asked! I was just getting to that part. To dig into the many combos available in this deck, we first have to identify what cards are the cornerstones of the deck. I know this is a bit of a re-hash, but it’s just a quick reminder:
- Counting Coppers gives you more card draw and a large reserve. By running 2 of them, you have two full turns that you can trigger abilities that take advantage of these two things the plot gives you.
- Craven and Milk of the Poppy control your opponent’s characters. When their characters are controlled, they are going to want to do whatever they can to remove your control over them as soon as possible.
- The Wall is a card that kind of wins you the game.
- Maester Aemon saves your characters from death and protecting him is extremely important.
- Halder is another extremely important card in certain match ups – most notably Targaryen, as his ability allows you to defend challenges you might not normally have been able to because of fear of Dracarys. He’s not as much of a corner stone as the Wall or Aemon, but he is as much of a key part of the deck as Benjen is and he makes challenge maths a nightmare. As all your characters are, generally speaking, pound for pound worse than your opponent’s, you need all the strength buffs you can get. Between your Cravens, Practice Blades, Longclaw and any locations you might be running, you can pump strength quite considerably.
So, what cards would combo nicely with these cornerstones? Let’s start with Counting Coppers!
Counting Coppers Combos
Old Forest Hunter
By drawing 5 cards before marshalling, this plot allows you to see more of your deck. Seeing more of your deck means you’re going to find a lot more Cravens, Milks, Economy and, generally speaking, whatever you need to beat whatever you’re up against. This also gives you a lot more cards in hand, making intrigue challenges against you not hurt as much. In addition, it gives you more ammunition for the Old Forest Hunter. I’ve had multiple games where I was one gold short of playing something extremely important. In one game, my opponent had a Nymeria and I only had 1 military icon, an Old Forest Hunter. If Nymeria stole that military icon, my opponent could have forced me to kneel the Wall. I needed to draw a military icon, so I played Counting Coppers, with a King’s Road in play. I didn’t draw any military icons (Damn you deck!), but I did draw Littlefinger. I used my two gold and my King’s Road to play Littlefinger, now knowing that I needed to dig for a Milk of the Poppy to stop Nymeria. And, damn it all, if the 7th card I drew that turn due to Littlefinger didn’t happen to be my second Milk of the game. However, with no gold left, this normally would not have helped me. That’s where Old Forest Hunter comes in! I was able to discard a dupe of Castle Black and get the gold necessary to milk Nymeria. I went on to win that game once I finally drew another military icon the following turn.
The Watch Has Need
The Watch Has Need is an event that keys off your reserve value. Now, reserve value was very valuable for the Night’s Watch already because their Ravens can really take up a lot of hand space when you’re returning them to hand each turn, but this is just another added bonus. With Samwell Tarly and an Iron Throne out, you can search up to 12 cards deep into your deck and grab as many Rangers , Stewards or Builders as you can find in those cards, based on what you called prior to drawing up. If you want to, you can even run a Northern Rookery to up that potential value to 13 (special bonus, Northern Rookery is another trigger for Halder!). I’ve had turns where this has generated 5 cards drawn for me. I’ve also had times when it only netted me one card. I have not yet whiffed completely. Not only does this make it so that you can dig for whatever icon you’re missing (if you really need more intrigue icons, call Steward, for example), but it only further increases your card advantage.
Daye even had an amazing play just a few weeks ago that didn’t even occur to me. He had a game where he did not have any intrigue icons on the board and had spent all of his gold (and used Old Forest Hunter in the challenges phase already). His opponent declared an intrigue challenge. So Daye used Old Forest Hunter again to gain a gold, played this card and called Steward. He drew a few cards, one of which included Dolorous Edd. He knelt his faction card, played Dolorous Edd and kept the Wall standing, because of this event. It had never occurred to me to use this during the challenges phase for that purpose, but it can do that as well.
Craven and Milk of the Poppy Combos
You’re going to start to notice a pattern here, so I will gloss over the examples I’ve already given. With just a cost of 1 gold, these two attachments can be drawn and played even with no gold if you have Old Forest Hunter out. In addition, as stated above, Counting Coppers, as well as the other immense card draw in this deck (Messenger Ravens, Arry, Samwell Tarly, Littlefinger), gives you a very good chance of seeing several of these throughout the course of a game. But let’s talk about the ultimate combo these two cards create.
The Watcher on the Walls
As I’ve said before, Craven is game changingly good. Once it hits the board, it becomes your opponent’s number one priority to remove it from the board. And, with how much draw you have in this deck, you’re going to see at least 1 Craven per game on average, probably 2. I’ve had multiple games where I have seen all 3. This stuff happens when you’re seeing ~30 to 40 cards in your typical 5-7 plot game.
So, your opponent’s number one priority is removing these Cravens and Milks that you have in your deck from their big, expensive characters. With the limited amount of attachment hate available in this game, their plan A is Confiscation. So, consider the first negative attachment you play an inevitable loss – your opponent is almost certainly running Confiscation and they will almost certainly play it the turn after you Craven their best attacker. But once you draw and play your second? The only other attachment hate available to most decks is Rattleshirt’s Raiders.
Well, the thing that Rattleshirt’s Raiders needs to do in order to remove an attachment is win a military challenge. Since Night’s Watch has one of the best military presences in the entire game, that means they will likely have to commit multiple very valuable characters to that military challenge. This is the perfect time to play Watcher on the Walls. It kills their Rattleshirt’s Raiders and could very likely take out 1 or 2 valuable targets as well. It’s the perfect storm. You are compelling them to do a military challenge that they need to win in order to get their best attacker back, but then making it so that if they commit too much they may lose their entire army. It’s a lose lose.
You are giving your opponent no good options. Even when you have zero gold, Fealty can play this card. Or, if you have Old Forest Hunter, you can pitch a card for a gold and then play this event. There are multiple ways of playing it and, with Dolorous Edd, your hand is safer than ever before. With the increased card draw in the deck, you have a very good chance of drawing this card. The deck works so well to counteract those big military attacks needed to remove the cravens that you put on their characters.
The Hand’s Judgment
Credit to Daye for this one, because he has convinced me to put Hand’s Judgments back into this deck over Nightmares. The truth is, you can go either way. Nightmares turns off their threats and there is no denying that that is extremely valuable, especially in certain match ups, such as Greyjoy. Nothing is more frustrating for a Greyjoy player than having Nightmares played on their Fishwhiskers when they do a single attack with him on a winter plot turn. Or Nightmares on Robert Baratheon when he has +6 strength from knelt characters.
However, I’ve found (and Daye has convinced me), that it is more valuable to stop your opponent’s Nightmares than it is to use your own Nightmares. A Nightmares on your Wall, or on your Aemon or on your Benjen can really suck and being able to cancel that is, arguably, far more valuable than you using Nightmares on your opponent. And it doesn’t stop at Nightmares. In most games, your opponent will be relying on an event to achieve a swing in the balance of the game. Being able to completely stop that simultaneously allows you to stop their play, while benefiting your own win condition (defending the Wall). Hand’s Judgment is a reactive event and very well suited to Night’s Watch/Fealty, a reactive deck build.
Why am I putting this under an interaction with Craven? Well, this goes hand in hand with The Watcher on the Walls. If your opponent is committing to an all in military challenge to destroy your Craven/Milk of the Poppy, even when you have two rangers on the board, chances are they are, at least somewhat, familiar with the danger of this play. They are either risking it and hoping you don’t have it, or they are holding a Hand’s Judgment. The ability to cancel the Watcher on the Walls is a very big swing for your opponent and, if they do use their Hand’s Judgment on your Watcher, you’ve put yourself at a disadvantage as you knelt two rangers for pretty much no reason.
But if you have your own Hand’s Judgment? That could bait them into a false sense of security if they are relying on their cancel to keep their characters alive. Granted, having a few Cravens on the board, having a Watcher on the Walls in hand and having a Hand’s Judgment is somewhat of a large combo that may be hard to assemble but, remember, you have a looooot of card draw in this deck, so it’s not unreasonable.
I put The Wall, Maester Aemon and Halder down as cornerstones for combos, but the interactions they have are fairly obvious and I don’t want to further bog down this article, so I’ll quickly list them out:
The Wall
The Sworn Brothers make this, and every location, cheaper to marshal, making up for running 3 low cost plots.
Dolorous Edd and Arry allow for surprise defense that gets around stealth and other unsavory effects.
Thoren makes it so that, if you can win a challenge on defense, you can gain even more power. The fact that the Wall gives two power will put pressure on your opponent to commit to challenges that they may not be able to win in order to kneel some defenders and possibly get a challenge through to kneel the Wall. Thoren makes this strategy less attractive.
Veteran Builder can stand the Wall if you do find that you let an unopposed challenge through.
Hand’s Judgment can cancel any Treacheries or Nightmares that seek to deactivate the Wall’s power gain for a turn.
Craven can be used to stop their best attackers from attempting to take down the Wall. Especially in the case where they only have 1 character with a certain icon.
Maester Aemon
Here to Serve can go grab Aemon and play him for free. This works especially great if you have a dupe of Aemon in play or in hand, as you can then dupe him for free, protecting him from nonsense like Ser Ilyn Payne or Venomous Blade.
Hand’s Judgment protects him from being Nightmares’d.
The Watch Has Need can be used to search for stewards if you need to dupe him.
Halder
Halder provides strength pumps that even the most seasoned opponent may forget about. He not only makes The Sword in the Darkness, The Shadow Tower and Thoren Smallwood better, because your opponent either has to overcommit to win their first challenge or risk you triggering your defensive win cards, but he also makes it possible for you to attack and win challenges more easily when you need to as well! He works great at getting your characters out of Dracarys! or Plaza of Punishment range, and he makes challenge math very difficult for your opponent by providing a threat of activation. Also, there is no limit on his action! It’s ridiculous. Got 2 Cravens, a Practice Blade and a Longclaw out? You got 4 strength that you can throw around whenever you need to. And, if absolutely necessary, you can kneel the Wall, The Shadow Tower or Castle Black if you desperately need to win one challenge.
I had one game where my opponent was able to reach 15 if he won a power challenge plus his renown. He declared a power challenge and I was able to tie him if I knelt everything except my Wall. So I bit the bullet and knelt the Wall to win that challenge. That triggered my Thoren and I won the following turn by playing For the Watch! and playing another Ranging Party and another Practice Blade.
Thank you for reading Part 1 of this article. With an understanding of what cards this deck is centered around and with these combos in hand, you can quickly turn a disadvantage into an advantage and swing the game in your favor. You can read Part 2 here, where we will discuss how to play the deck, what to look for in set up, the weaknesses of the deck and how to counteract those weaknesses.

