

What’s up guys! Joe from Cincinnati here. If you haven’t noticed, I haven’t written an article in a while. If you care to know why, it’s a combination of personal life changes as well as a lack of game play changes (at least for the Crab Clan.) Yes, that’s right. It should come as no surprise that someone who writes articles about strategy and deck building options for the Crab Clan would run out of things to write about when the strategy and deck building options for the Crab Clan have not changed in nearly 18 months.
Now, that’s not to say the one option we did have wasn’t extremely powerful. After all, Crab was so good that they won or came in 2nd place in most of the Koteis from the past 6 months or so (By my count, 4 wins and 3 second place finishes in 10 total Koteis in 2019. Thanks for tracking all this stuff, Imperial Advisor!) And it was done with, virtually, the same deck in every case! Hell, even Darren Hazelden was FINALLY able to get Hatamoto with the deck, so that alone is a testament to its power level!
But why am I telling you this? You know what deck I’m talking about. Crab splash Unicorn has become the most notable deck in the entire game by this point. Well, times, they are a changing. And now Spyglass has officially been restricted! Not because it was too strong, of course. As Tyler made abundantly clear in the article, he did not restrict Spyglass because Crab was overpowered…
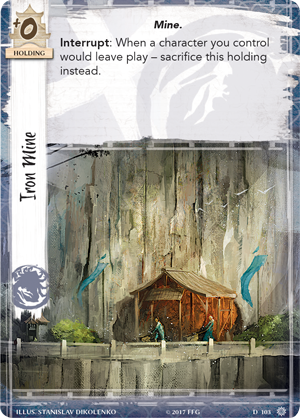
“However, as an important note for the future, I don’t intend to hit any clan with restrictions whenever they’re the best, unless they’re noticeably stronger than all their competitors—and Crab is not that, even now. The element that prompted this restricted list update is that this Crab deck has not changed in a meaningful way since the release of Iron Mine (Meditations on the Ephemeral, 103) at the end of the Imperial Cycle, and the deck archetype is powerful in a way that isn’t conducive to evolution and innovation.”
Good looking out, Tyler. The Crab clan can always rely on the designers to assist us in creating new and exciting deck ideas and concepts…by taking stuff away from us. That’s one way to go about it, I suppose XD.
I personally was surprised that Crab got through the April 29th RRG update that nerfed Restoration of Balance and Tadaka and added a variety of other cards to the Restricted List unscathed. Even then, we were near or at the top of the meta, and then the new RL nerfed down nearly every other top clan in some way other than Crab. I remember a certain amount of outrage (from non-Crab players) at that, but the following 2 Crab wins and 2 Crab Runner Up finishes (out of…4 Koteis) definitely didn’t help matters. As the Crab clan continued to dominate Koteis and even smaller EC tournaments (though much harder to track for obvious reasons), the angst in the community reached surprisingly high levels. And that’s saying a lot for this community :P.
And with even the People’s Champion, Aneil Seetharam (Mind’s Desire) defecting to Crab, it all seemed relatively inevitable that we’d get hit by the restricted hammer eventually. That hammer follows Aneil wherever he goes, after all 😛 (See: Dragon and Phoenix Clan). Soon after the Birmingham Kotei (which, as it happens, had its own level of controversy because the EU and the UK did not have the Crane pack yet, but the new Restricted List was enforced, meaning Crane were essentially screwed out of playing Steward of Law but without any of the new cards from their clan pack to soften the blow), another win for the Crab clan, rumors regarding the new Restricted List in July began circulating.
The common theme behind these rumors? “Fuck Crab”. There wasn’t much credence behind them, but you could smell the blood in the water. The masses were unhappy. And the Devs had to respond…
On Tuesday, June 25th, they did just that. FFG released the new Restricted List with one single change. + Spyglass.
And so it was. The Crab Clan has been put in their place…Through the restriction of another clan’s card… And now, for the first time in nearly 18 months, Crab clan players had to actually make a deck building decision other than the defiant “Okay! I will play, literally, anything that isn’t Unicorn splash! Lion splash? You got it. I don’t care….”
So where do Crab players go from here? Do they stick with Spyglass and remove Rebuild (or Charge) from their decks? Do they drop Spyglass and stick with Rebuild (or Charge)? Or do they, for some reason, go with another entirely new restricted card? (Hint: It’s not this one)
Do We Stick with Spyglass?
The initial reaction to the RL update was predictable. If a deck is built around Spyglass, when it gets restricted the obvious choice is to continue using the card that you built your deck around. After all, Watch Commander is amplified exponentially by Spyglass’s non-bid card draw (because it allows Crab to bid low early, putting pressure on their opponent’s honor without sacrificing card advantage) and participating in multiple conflicts is basically the calling card of the Crab clan, with the likes of Fight On, The Mountain Does Not Fall, Steadfast Witch Hunter and, now, Hiruma Signaller (also known as Fight On On a Stick). For a clan that wants to drop their bid and pressure their opponent’s honor with ample non-bid card draw, Spyglass seems like the logical direction.
And it’s not an unreasonable position to take. At all. But I want to take a deep dive into the ramifications of removing Rebuild from this deck archetype. I make this argument with a full acknowledgement that this thought process will not be shared by all who read it, even after my explanation. Just bear with me as I make assumptions regarding what card choices affect others…
Ramifications of Removing Rebuild from Your Deck
- The first thing you need to consider once you remove Rebuild from your deck is Miya Satoshi. After all, one of the best parts of using Satoshi is getting early access to your Iron Mines via Rebuild (by milling them and rebuilding them at your leisure). Without Rebuild, if you mill 2 of your 3 Iron Mines with one of your activations, your ability to maintain your spyglasses just decreased significantly. Now you’re relying on reprieves, which can be removed by a variety of commonly played cards, the final Iron Mine somewhere in your deck and then the Vanguard Warriors floating through your deck (if your mill didn’t remove them as well.) This, in a way, completely defeats the purpose of choosing Spyglass over Rebuild, because taking Spyglass means you’re still focusing on the tower strategy (multiple attachments on one character, get them into 2 to 3 conflicts per round and save them over and over again), but you subsequently are removing one of the best tools for sustaining your towers! So do you keep Satoshi in, at the expense of your holdings? Or do you remove him because you can no longer control your holdings with him? Well, if you choose the latter…
- Now you have severely weakened several other cards in your deck. First and foremost, Keeper Initiates lose a ton of value without Miya Satoshi. That means fewer characters on the board, which means fewer unopposed conflicts for you (as chump attacks are often strong options to get an unopposed honor ping off on your opponent) as well as fewer cards to defend against unopposed conflicts (as well as being 2/2 characters when defending with the stronghold effect), fewer cards for sacrifice effects (such as Witch Hunter), fewer cards to win favor etc. Keeper Initiates do not really seem like much at first glance, but their impact on the game is significant. Seeing them less often, or seeing fewer of them per game, is a huge hit to the deck. Now, I would not recommend removing Keeper Initiates from your deck, as they are still valuable even without Satoshi, but they undeniably lose power without him to get them faster.
- Another effect of removing Satoshi from your deck is Karada District. Crab’s only native attachment control. It’s a 1x limit holding, so you can’t really rely on seeing it when you need it unless you use Satoshi to go find it faster. The decrease in reliability to get Karada District due to the removal of Satoshi hurts several key match ups for Crab. Most notably, the Crab Clan Mirror. If your opponent is running Satoshi and you aren’t, you suddenly have a HUGE disadvantage in the mirror, as they are more likely to get Karada District before you, significantly decreasing your chances of winning, since you can’t really use Reprieves or Watch Commanders or any other powerful attachment while they have Karada and you don’t. It also negatively impacts the Dragon match up, the Crane match up and the Unicorn match up, to an extent. All of these clans have important attachments that you’d like to control and without Satoshi getting your Karada District out, you may be stuck dealing with their best cards with little or no answer to them.
The goal in writing this out step by step is to emphasize exactly why the Crab Unicorn deck was so powerful… Its synergy. Everything worked with everything else and it all came together to be an incredibly powerful and consistent deck. And Rebuild, in my opinion, is the crux of that synergy, not Spyglass. Drawing cards is important, but card draw can be replaced. the versatility and answers that Rebuild provides cannot.
Okay, Smart Guy, Then What Do I Play if I’m Removing Spyglass?
Good question, personified narrative device! and that’s where this article gets interesting! Because I got some ideas for you…
…I got AN idea for you. I-It’s one idea… Just the one. Otherwise, this article would start to just get out of control. And we don’t want that…
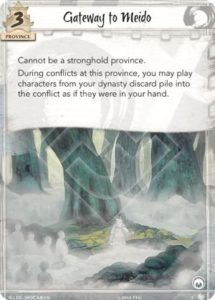
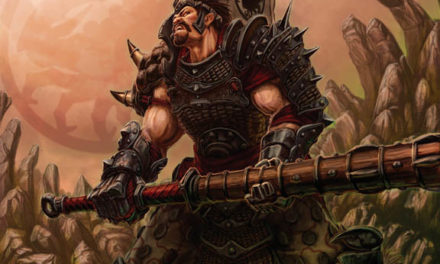
You see…The first pack of the inheritance cycle came out two weeks ago and it had some interesting cards in it. The first one, I’ve already mentioned. Hiruma Signaller. Another card that incentivizes towering? Surely, this is even more reason to play Spyglass, right?! Well, hold on, because it gets better. The other notable card for Crab is Gateway to Meido. I’ll post the image of the card as well, just to make the banner image for this article make more sense.
Get it? 😀
…Cuz…Cuz Jack Sparrow is the Crab player…stuck in the vast ocean of the meta with just his spyglass to keep him company…until he sees land…at which point he knows he doesn’t need that spyglass anymore…
…I wish I was more clever…
Anyway, with this card you are able to recur cards from your dynasty discard pile while you’re defending it. This includes playing cards like Vanguard Warrior for more saves and Kaiu Envoys for additional resource production over the course of the game.
But that…is just the tip of the iceberg, my friends. Oh…we have only just begun to discuss the nonsense that this province creates.
You see…the designers of this game have a really “interesting” mechanic that they’ve decided to give, in large part, to the Crab clan. You can see it with cards such as Hida Amoro, Hida Tsuru, Watch Commander, Yasuki Oguri and Yasuki Taka. What do all these cards have in common? Well… the word, “unlimited.” Which is quite the coincidence. Because, with this new province, the Crab clan is now capable of performing what is, essentially, an infinite (or unlimited) combo.
The basic definition of an infinite combo is a series of actions that can be performed an unlimited number of times due to the combo’s synergy refreshing the resources used to create the combo. (this includes the cards themselves as well as any honor, fate, characters or activation opportunities). These combos create a situation where, if they are not interrupted in some way by the other player, the only possible results are: the game ends with the combo player winning or time is called (because you have theoretically infinite number of actions, but not enough time to do them all). Magic players will be familiar with this concept, as I hear there are plenty of examples of this in that game. Now, this particulat combo, at least its baseline (more on that in a bit) isn’t necessarily a true infinite combo, but it’s close enough to be setting off alarms in many players’ heads (as we saw on Facebook last week ^^ ).
The combo works like this: Your opponent attacks Gateway to Meido. You, predicting they’d eventually run into it, have been planning for this by saving a ton of fate. You either already have in play, or play from your discard pile (via Meido) 1. Yasuki Taka, 2. Yasuki Broker and 3. Vanguard Warrior (VW). This has a relatively high upfront cost, as it’s a 5 cost character, a 4 cost character and a 2 cost character (minimum start up cost of 11 fate). Now, you use the Vanguard Warrior’s ability to put a fate on one of your characters (it doesn’t really matter too much who you choose). Because you have Taka and the Broker, you gain 2 fate (1 from Taka, 1 from the Courtesy that the Broker gave your Vanguard Warrior). In addition, you draw a card from the Sincerity that the Broker gave the Vanguard Warrior.
It’s a pretty neat trick, since the VW basically paid for itself, but also gave you a fate on a character and a card drawn to your hand. But wait…now that Vanguard Warrior is back in your discard pile…So you can do it again. Note: Gateway to Meido is not an action with an activation limit. It’s just a text box. A passive effect. And it doesn’t remove the cards from play once you use them, for some reason. So, with a character that self-sacrifices, like VW, who costs 2 fate or less, you can now play and sac the same character over and over again for no additional cost (as the card refunds itself through Taka and the Broker), and you draw a card and place a fate on another character for each time you do this. This inevitably leads to you drawing your entire deck and putting…a ton of fate on your characters. I’d say that, roughly, makes up for the card draw you lost by removing Spyglass.
Now, the truly interesting part of this deck style is that this combo has layers. The above description is the base layer. This is the baseline for the remaining combo pieces added onto this strategy. The viability of this or any of the following layers is up for debate, with each having variable success vs risk rates. Only testing will conclude how many layers are appropriate and when you begin to get into Jank territory. So let’s start with the first layer above the baseline: Fate production.
Layer 1: Fate Production
This layer is relatively simple. Obviously, you’re putting all this fate on your characters with your VW recursion. But your banked fate remains relatively the same. If you are so inclined, you can choose to build up this fate on one character, theoretically up to 30-40 fate, depending on how many cards are remaining in your conflict deck at the time you start the combo (as the sincerity trigger limits how many times you can do it, as you cannot draw cards if you have no deck or discard pile). Once you’ve reached this point where you cannot recur the VW anymore, you can now play a Jade Tetsubo on whichever character you have that has the most military strength (other than the character you put all that fate on). If your opponent attempts to use Let Go, Hand to Hand or Calling In Favors to remove it, you have Defend Your Honor to cancel their attempt. Then, you use your Jade Tetsubo to knock the fate off of whatever character you put that 30-40 fate on. This all goes to your bank account. From there, you can use that new fate to buy out your entire dynasty discard pile if you feel so inclined. Or you can just have a ton of fate. Whatever way you want to go with it :). This layer creates an economic advantage that will be difficult, if not impossible, for your opponent to overcome, resulting in you inevitably winning the game.
Layer 2: Honor Manipulation
Rewind to the point at which you’re holding your entire deck in your hand. Let’s say you want to use this insane card advantage to end the game right here. Well, you can! With the card Levy, you can take up to 3 honor from your opponent. It’s a free event, so there’s no resource risk in performing this layer. If they have fate, they will almost certainly give you as much fate as they can, to protect their honor. But, once you’ve played your three Levies, you can repeat the VW combo. This will shuffle your deck, you lose 5 honor, and you can draw those 3 Levy back up. Then you can play them again. Eventually, your opponent will run out of fate. At which point, they must give you honor. Rinse and repeat this until your opponent runs out of honor and you win the game.
Layer 3: Preventing Honor Loss
Now, there may be circumstances where your opponent has enough fate to prevent you from taking all their honor before you run out of honor due to the 5 honor reshuffling cost (because you keep playing your Levies and then getting them back via reshuffle). If this is the case, you can play the card Prayers to Ebisu. If you dip below 6 honor, the point at which reshuffling your deck kills you, you can play Prayers to Ebisu to immediately gain 4 honor, taking you out of the danger zone and allowing you to continue the combo. And, just like the Levies, you will be recurring these Prayers back to your hand each time you reshuffle and VW them back into your hand, as needed. You can do the iterative math for yourself, but what we’ve found is that, outside of your opponent having an inordinate amount of fate to prevent Levy from getting you any honor at all, the combo virtually guarantees victory once you start it. These last two layers are what make this deck approach a true infinite combo.
Layer 4: Going ALL IN
The first 3 layers not enough for you? Well, then you can add even more redundancy to the deck to go further in on the combo. And, before I get into this, I will say that I suspect this section is pure jank. But if you want to run this list to the bounds of its absurdity, this is the section for you!
Vanguard Warrior is obviously the simplest combo piece to get the draw engine going, but he isn’t the only option. Another way to create this infinite combo is with Kaiu Inventor and Funeral Pyre. For this version of the combo, you bring the Inventor into play with Meido, use her ability to trigger Funeral Pyre an additional time and sacrifice the Inventor with the Pyre (gain 2 fate, draw 2 cards etc). Then bring the Inventor back, activate her again to trigger the Pyre another time, and sacrifice her. Just like the VW, this can be repeated as many times as you want, drawing cards along the way.
Another way of “going all in” is with Eager Scout and In Defense of Rokugan. With this combo, you are actually generating new fate with each time you use it, since Eager Scout costs 0 to play, IDoR costs 1 to play and then you gain 2 fate when the Scout leaves play. Then you can loop your IDoRs the same way you do the Levies and Prayers. There is some contention about whether setting a character’s strength to 0 after you’ve already set it to 0 is a change in game state, so this may not be a truly infinite combo. But the number of times you can do it is at least equal to the number of characters your opponent is attacking you with, so it adds to the combo even if the ruling is not favorable for the combo.
I’m sure there are other little combo tricks to abuse Meido not included in this article. Maybe you can come up with even better options? 🙂
Layer 5: Protecting the Combo
In a perfect card game world, no strategy is without its weaknesses or counters. And this combo is no different. There are steps your opponent can take to prevent you from automatically winning with this strategy and they aren’t fringe or obscure strategies either. The simplest ones are:
- Cloud the Mind. Either on the Broker, Taka or the VW.
- Gossip. To prevent you from playing one of the cards out of your discard pile needed for the combo, since Gateway to Meido does specify that the cards played are treated “as if they were in your hand.”
- Bayushi’s Whisperers. It’s a more obscure choice, but the Scorpion 6 coster can do the same thing that Gossip does.
- Send home/Removal effects. If Yasuki Broker, who must be in the conflict in order to give the characters sincerity and courtesy, is removed from the conflict, then suddenly, your characters do not give you cards or the 2nd fate, which limits the combo to how much fate you have (since Taka will still give you 1 fate, making VW cost 1 net fate each time).
- Attachments that forbid Yasuki Broker from participating (such as Stolen Breath or Pacifism.)
- Fucking Breaking Gateway to Meido before the combo gets going.
- Moving Away from Meido (Chasing the Sun is the only example that I know of right now).
Luckily, there are answers to…some of these counters. They definitely aren’t perfect, but you can typically work around them.
1 and 5. The first comes in the form of Miya Mystic! Removes Clouds and Stolen Breath/Pacifism. If you have the fate, you can recur these from your discard pile to answer their attachments before re-initiating the combo. This will cost fate, but if you have excess fate, you can still protect against these answers.
- Hiruma Signaller or Rebuild for Favorable Ground (or just having Favorable Ground already) allows you to get your broker back into the conflict. This also applies to the Stolen Breath/Pacifism answer, as you wouldn’t have been able to assign the broker initially if they used these attachments on her.
And, for #4 and 7, if they are event based responses, Defend Your Honor will serve you well.
As for the others, Crab is blessed with defensive buffs and other effects that mean if your opponent played a Gossip or Whisperer to block the combo, you can still use the Meido to augment your board while you wait for the next turn to set the combo off.
I’ve had games where my opponent has turned off Vanguard Warrior (via Methods 2 and 3), for example, and I still bought the Broker and Taka with 1 fate each (so they’d last until the next turn) and then bought a Hiruma Signaller from my discard pile and used him to bring in a bowed Kaiu Envoy (which netted me a card). That, along with buying another Kaiu Envoy from my discard pile, allowed me to gain a few additional resources out of Meido while I waited for the next round. And, as for #6…you just gotta protect your province at all costs. And that brings us to the next critical question…
What Splash are you Suggesting for This Nonsense Deck?
Uhm…well…you see…the thing is…
…The deck will still run Unicorn splash…
I know! I know!…The Spyglass restriction was meant to make Crab players try new things and…at least if this deck comes to fruition…it will have failed miserably in that regard. Setting aside how comical it is that the entire point of this restriction is to make Crab players play something new and I, someone who (ego talking here) helped create and spread the Crab meta deck as it was to this point, am encouraging people to stay the course with the same clan splash, I still believe Unicorn splash is our best answer to the current meta as it stands.
The primary reason to stick with Unicorn Splash is Talisman of the Sun. You see…in order for this whole combo to work, you need to protect Meido when you’re not ready for the combo to go off and take your opponent to Meido when you are ready for the combo to go off. Talisman does this PERFECTLY. If they are attacking and breaking Meido (see #6 above), Talisman moves them away from your precious province. If they have revealed Meido before you were ready for the combo and now refuse to go back to it, Talisman brings them back to where you need them to be once the combo is ready.
The typical Unicorn splash pre-restriction was 3 Spyglass, 2 Talisman, 3 Wayfinders. I think we can safely say that 6 influence gained from not including Spyglass can now happily go to a 3rd Talisman. Now, you have 4 influence to play with. That could be…Adorned Barcha (this is currently what I’m testing, but even now I have my doubts due to its requirement to attach to a unique character). Or Shinjo Ambushers. Or Gaijin Customs. Or Spoils of War. Or Ring of Binding. Or you can just not use the influence and play more Crab cards! Ultimately, it doesn’t matter, as long as the cards are strong and work with your preferred strategy!
The deck is, after all, still in its infancy of testing. I can’t say with certainty what the end deck list will look like. But the concept is there.
I don’t know, Joe…This Deck Sounds Super Flimsy…What if they Disrupt the Combo? Or What if You Can’t Assemble the Combo in time?
So, this is the big question. And this is what will determine if the deck is truly viable or not. If you are unable to protect Meido early on or if you don’t see the combo pieces, the deck may stall out. That said, Miya Satoshi (remember him? From 30 minutes ago? 😛 ) irons out a TON of the variability in this deck. He fills your discard pile with the Brokers, Takas and Vanguard Warriors with his ability. He assists in defending early on, as he is a strong political body in a military clan. He gets you Miya Mystics to solve problems #1 and 5. He sustains himself, giving you more time to assemble the combo without costing more fate and holds your Talismans for as long as you need him to (since he fetches his own duplicates). He even gets you Karada District in case your opponents try and steal your Talisman to prevent the combo!
And, on top of all that, the baseline deck (the one without the Levy and Prayers Layers, which I do think are pretty janky additions), is as little as 10 TOTAL cards different from the old Crab Unicorn deck (only 7 cards different if you consider that you had to replace either Spyglass or Rebuild anyway): Gateway to Meido, 3 Brokers, 3 Taka, and 3 Spyglass removed. There are additional, optional changes you can make, particularly the Levy and Prayers additions, but the basic strategy does not occupy all that much deck space. I’m testing a couple Funeral Pyres as well just to facilitate finding Talisman and, in the case of Meido being broken before the combo is assembled, to maximize my Brokers.
So, if they do break Meido before you can get the combo off, you can revert back to classic Crabicorn strategy of towering and outlasting your opponent! Back to business as usual! ^^ Just…without Spyglass haha. Essentially, this deck isn’t built around the combo only. It’s an option if you’re able to set it up. If not, your deck is mostly the same as it was before the restricted list forced us to innovate. While removing Spyglass undeniably weakens the general strategy, it doesn’t destroy it. We’ve all won games without ever seeing Spyglasses or having them immediately removed by Let Go, after all. The “abort button” is literally just playing the game the same way we have been for the last 2 years.
Another question that came up regarding this deck is whether or not it would be errata’d once the Devs learned that it existed. Well, thankfully, someone brought it straight to Tyler, and he apparently already knew about it! This was his response:
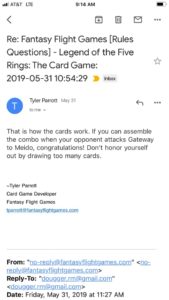
So, we officially have Tyler’s blessing to attempt to break this combo! 😀
I Don’t Trust You, but I’m Willing to, Skeptically, Entertain Your Idea. Got a List for Us?
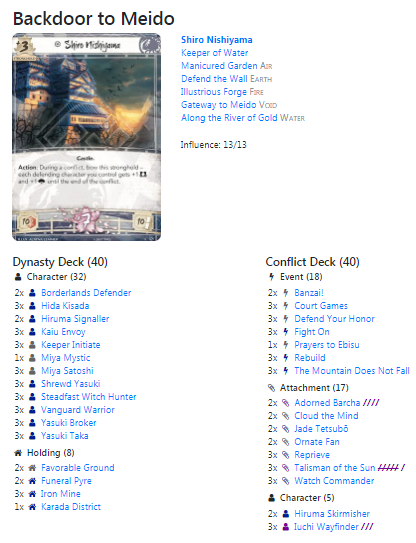
So, as I said before, the list is still very much in progress. There are questions about whether more sacrifice cards, such as In Defense of Rokugan or Way of the Crab, should be included in the deck for the same reason I included Funeral Pyre above: additional sacrifice effects in the event that the full Meido combo is not successfully pulled off. There are also, obviously, questions about whether the Levy/Prayers Layer is worth the effort and deck space or if it turns the deck into a full “combo or bust” deck. Hell, there are questions about whether this entire deck strategy is the correct way to go in general. The point is, it’s early and we still have a lot of work to do to optimize this deck. With that said, below is the Raw, Unoptimized, Diamond-in-the-Rough deck list that I (and my testing group) have been working with… And, important to note at this point that this entire deck concept was originally defined by Max Williams (WhackedMaki) and was refined with the assistance of Mozi, Damabiah, Action Johnny and Pimittens…
So, what do you think? Is this strategy too pie in sky to actually work? Are we neglecting a better splash that allows us to retain the power level of the previous deck in a more traditional way? Or is this whole thing just crazy enough to work? Is this article incoherent due to my inability to accurately explain the combo? I’d love to hear your feedback and, if you have any questions about the cards included or if you have ideas for how to further optimize the deck, I’d love to hear from you! Thank you for taking the time to read this mammoth article and I’ll see you next time! 😀


