
Hello! My name is Schrodes and I hail from North Carolina. When I was new to the game I searched out every article I could find to help me learn the game and improve as quickly as possible; now I’d like to return the favor to others.
But first, because I know you don’t want to read advice from a scrub, allow me to pass along my credentials. I started playing L5R just before the first pack of six was released, blowing tons of money on three cores then two of each expansion. Then I fell into the trap of buying three more cores so that I could make multiple decks without having to pull cards from one to another. Sound familiar?
The first couple of tournaments I went to were pedestrian, losing slightly more than winning. But after I switched from Crane to Crab, the light turned on for me. Since then, I’ve gone two for two in local Stronghold kits and achieved Crab Hatamoto and top four in the Atlanta Kotei.
By no means am I the best Crab player in the world, but I have encountered a fair amount of success and feel like I know what I’m talking about. Certainly, other good and great Crab players can disagree about the value of Gaijin Customs (GC for short), but keep in mind play styles vary and GC can be a very valuable card given the right use and expectations. Keep in mind, this is a fairly basic article and for the experienced vet, probably nothing new; I aim to help those newer to the game or to the Crab Clan in particular.
But first, a quick recap on what GC is for those who are unfamiliar…
GC is a Unicorn conflict card that costs 1 fate to play and reads: “Action: If you control a Unicorn card, choose a non-Unicorn character–ready the chosen character.”
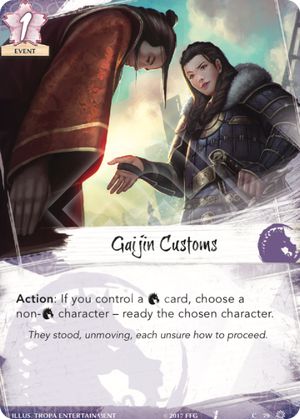
So for one fate, you can ready any non-Unicorn character on the board (not just the one with the unicorn attachment!). This obviously comes with restrictions, but I find that overcoming those restrictions is fairly easy. It should be noted, I typically build one strong tower then supplement them with other characters as I can, working to get that tower into multiple conflicts per turn; GC works best with this type of strategy. It is very common to have a Shuichi or Defender with 1-2 Spyglass, Talisman, Watch Commander (WC), Katana, Fan, and Finger of Jade on my board, often honored (because of Talisman/Shameful). This would equate to a 7-8 military and 9-10 political skill, and getting that character into multiple conflicts every turn will win you the game (especially if they are playing into your WC).
In my Crab deck, I splash Unicorn with two Talisman of the Sun, three Spyglass, and 3 Gaijin Customs (Iuchi Wayfinder is a different discussion…). That means I have five cards in forty than meet GC requirements. Now, assuming I don’t mulligan any cards (which you should), bid five on turn one, and don’t get to draw extra cards (Shrewd Yasuki, Imperial Storehouse, Earth Ring, etc), you have a base chance of 74.17% to draw one or more Unicorn attachments and a 31.14% chance of drawing two or more. Those are pretty good odds.
As any Crab player knows, though, Let Go is a thing (A very common thing, at that). So if you happened to draw a GC and Spyglass/Talisman and want to play them turn one, you’ll most likely have to bait out the Let Go with something else. Most players are smart enough to not use it on a Katana or a Fan, so you’re probably throwing Watch Commander to the wolves if you’ve got it. Keep in mind, this is a three cost turn one investment, and that’s tough to swallow.
As powerful as GC is, I would much prefer to see The Mountain Does Not Fall turn one and then see GC round two, or if I have both GC and Mountain and an Iron Mine (which are good to mulligan for), then I’ll play a 3 or 4 coster turn one with zero fate and go to town with a character that will never stay bowed.
This ideal scenario is unlikely to play out in turn one though, so shooting for turn two is often the best you can expect. Generally speaking, I mulligan out GC pre turn one and dig for my Unicorn attachments early on. But you’d be surprised how often you can get this to work in turn two, either being first or second player. By turn two, I often have my tower with 2-3 attachments and have purchased one 3-4 coster or 1-2 smaller characters the second round. After card draw, you should be able to get 3-4 attachments on your tower to start round two (or play them on your character in the conflict to not give away what you have pre-conflict).
If you’re first player on turn two, attacking with this tower will often cause them to commit a lot of resources to defending, or otherwise concede a break to you for a single attacking character. After the conflict, GC them back up and now you’ve spent one fate to get 6-8 fate worth of character standing up again. That’s fate efficient. Continuing this scenario, if they attack back, you can (hopefully) Mountain the tower on defense so you can use him to attack again.
Conversely, if you’re second player on turn two, and your opponent is foolish enough to attack you, you should be able to have a big turn. Play Mountain during the conflict so you don’t bow, go attack, GC, then use the tower on defense again. Mountain lasts all turn, even if you have previously bowed from attacking, so that way you are spending two fate and two cards to get a character worth 8-9 fate into FOUR conflicts. Fate efficiency!
Other obvious uses are to unbow from a Mirumoto’s Fury, Against the Waves, Water Ring, Admit Defeat, or other effects that will bow you. I’ve even used it with AFWTD to ready my tower and used Favorable Grounds to get him back into the conflict. In a game where fate efficiency is key, getting a high cost character with loads of attachments into multiple conflicts per turn is seriously good.
The last thing that should be noted is that you need to save fate from the Dynasty Phase (see Joe from Cinci’s article about managing fate here. Playing a lot of 1 cost attachments, GC, and Mountain will certainly suck up a lot of fate, and you can’t do it if you don’t prepare for it. (This is why Shuichi is so good…one extra fate a turn is wonderful). Most times it’s not hard to pass first, and don’t worry if your opponent has three characters on the board to your 1, because your tower will be stronger and facing their characters piecemeal as you continuously unbow.
So to recap:
-Don’t aim for it turn one, if possible (too unreliable)
-Make sure you have fate to use it
-Use it on your best character/tower to win multiple conflicts per turn
I hope this basic introduction to GC helps those of you out there unsure if you should use the card! It certainly has won me plenty of games and draws deep sighs from opponents who think they’ve won the turn after the first conflict with my tower, just to see him stand back up ready to give them more grief.
Feel free to provide feedback or if you have specific questions, contact me at [email protected]. Best of luck, and remember Always Be Crabbing!
Decklist:
Total Cards: (85)
Total Conflict: (40) Total Dynasty: (40)
Total Influence: (13/13)
Stronghold:
1x Shiro Nishiyama (Core Set #1)
Role:
1x Keeper of Earth (Core Set #215A)
Province: (5)
Air (1/1) Earth (1/1) Fire (1/1) Void (1/1) Water (1/1)
1x Defend the Wall (Core Set #8)
1x Manicured Garden (Core Set #19)
1x Meditations on the Tao (Core Set #20)
1x Rally to the Cause (Core Set #23)
1x Shameful Display (Core Set #24)
Character [Dynasty]: (37)
3x Borderlands Defender (Core Set #31)
2x Crisis Breaker (Fate Has No Secrets #82)
3x Hida Guardian (Core Set #26)
2x Hida Kisada (Core Set #37)
2x Intimidating Hida (Core Set #32)
3x Kaiu Envoy (Core Set #27)
3x Kaiu Shuichi (Core Set #36)
3x Keeper Initiate (Core Set #124)
3x Miya Satoshi (Meditations on the Ephemeral #112)
3x Shrewd Yasuki (Core Set #29)
2x Steadfast Witch Hunter (Core Set #35)
3x Vanguard Warrior (Core Set #30)
Character [Conflict]: (5/10)
1x Guardian Kami (Disciples of the Void #26)
2x Hiruma Ambusher (Core Set #130)
2x Hiruma Skirmisher (Into the Forbidden City #50)
Attachment: (16)
2x Fine Katana (Core Set #200)
2x Finger of Jade (Tears of Amaterasu #20)
2x Ornate Fan (Core Set #201)
3x Reprieve (Core Set #132)
3x Spyglass (Core Set #193)
2x Talisman of the Sun (Meditations on the Ephemeral #119)
2x Watch Commander (Core Set #133)
Event: (19)
2x Assassination (Core Set #203)
2x Banzai! (Core Set #204)
2x Censure (Into the Forbidden City #60)
2x Court Games (Core Set #206)
3x Gaijin Customs (The Chrysanthemum Throne #79)
3x Rebuild (Core Set #136)
3x The Mountain Does Not Fall (Core Set #138)
2x Way of the Crab (Core Set #137)
Holding: (8)
1x Favorable Ground (Core Set #128)
2x Imperial Storehouse (Core Set #129)
3x Iron Mine (Meditations on the Ephemeral #103)
1x Karada District (Tears of Amaterasu #4)
1x The Imperial Palace (The Chrysanthemum Throne #72)

